| discalimer(s) | KEF history | woofer model ? | substitute? please NO | surround composition |
| chemical analysis | obtained spectrum | the spectra database | how to repair the rubber | the measure, before, after |
| Thiele and Small measure | conclusions | loudspeaker before and after | download files | . |
All trademarks mentioned and links are presented here for informational purposes only and to confirm statements made by the author. The author of these pages DOES NOT receive any remuneration from the mentioned brands and the listed links.
In any case if you decide to use the suggestions on this page you do so at your own risk. Repairing electronic equipments, even just opening it, can put your life at risk, so don't do it.
If you do not accept and/or not understand the statements in this disclaimer, written in blue, exit this page immediately.
Everything exposed in this web page is only a suggestion, probably you won't obtain the aim from you prefixed following it.
A true collector is looking for a) original items without any replaced parts, b) or if a Critical Restoration has been done that it is possible to go back to the original version. Lacking the previous 2 statements the object (not only for me) has a value of zero euros.
Be very careful when buying a vintage, antique or historic loudspeaker. After 40 or 50 years, the magnets suffer from demagnetisation and the neoprene suspensions are now a wooden ring, the plissé and impregnated silk has opened up in the folds, and the foam, now sticky like bitumen, will drive the repairer crazy.
And the worst is yet to come: oversized broken coils, oval or square suspensions that are impossible to find, cardboard cones with impossible angles. And there is no cure for everything.
Beautiful speakers, with captivating sound when new, but a proper restoration can cost much more than the car itself, as in the case of this Fiat 500B.
In public debates, from social media to television, we are inundated with incompetent, ignorant, and uninformed individuals commenting on everything. Rather than arguing their points, they often just shout them.
There is a group of people who have been suffering from a serious crisis for some time now, Experts are becoming increasingly depressed. They are attacked by a rising tide of skepticism ("How do they know these things?"), subject to recurring suspicions ("They must have their reasons for saying that!"), and overwhelmed by dialectical simplification that turns every debate into a clash of insults.
But it is better to read Paolo Fallai's article in the Corriere della Sera newspaper of 4 December 2025, The chatter of the know-it-all who mortifies the expert (in Italian).
No thanks, another chronological list of the construction and sale of the famous KEF loudspeaker is unnecessary; Andrew Watson's history is sufficient.
Instead, let's take a look at the shapes of the various elliptical loudspeaker models produced from 1960 to the present day.
BE CAREFULL, my drawing and ALL photos are under copyright and you have NOT right to use without written authorisation from me.
The problem of speaker ageing is not new. Starting with the work of Albert Neville Thiele, followed by Richard H. Small and then many others, including J.E. Benson and G. Margolis, they suggest running in the speakers before measuring them, but after years of use, ageing becomes apparent, as in Wolfgang Klippel's paper Mechanical Fatigue and Load-Induced Aging of Loudspeaker Suspension.
Before examining the issue of rubber suspension, let me look at the differences between the various models of this famous woofer.
 |
| Fig.1, from the internet (thank you!), here is a photo of the very first KEF B139 model MK1 woofer (1962?). Note the screws securing the magnet, the hole in the center, and the poorly shaped cardboard cone on the right, which may be a prototype. Here the photo in high-resolution. |
It's the same woofer, but perhaps a few years later.
 |
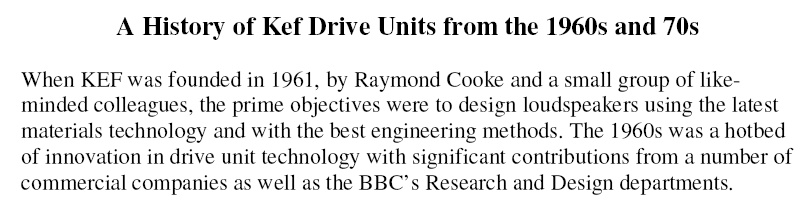
| Fig.2, from the internet (thank you!), here is a photo of the first model of the KEF B139 model 6171 woofer (1965?). We note that there are two slightly different series in the cone and suspension. There is also a removable screw in the center for tuning adjustments. Use mouse-over for front view. Here the high-resolution photo of rear side and also the front side. |
What interests us is the suspension (but also the spider), and with a little graphics analysis, we can examine this photo taken from the Internet.
 |
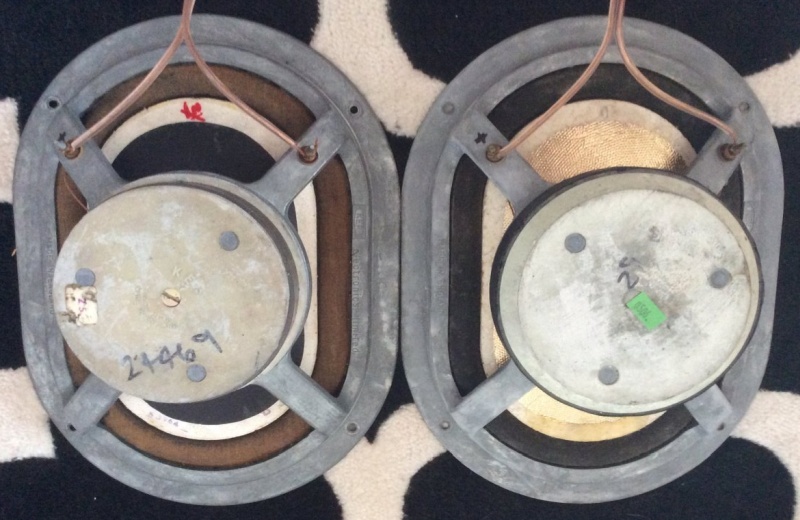
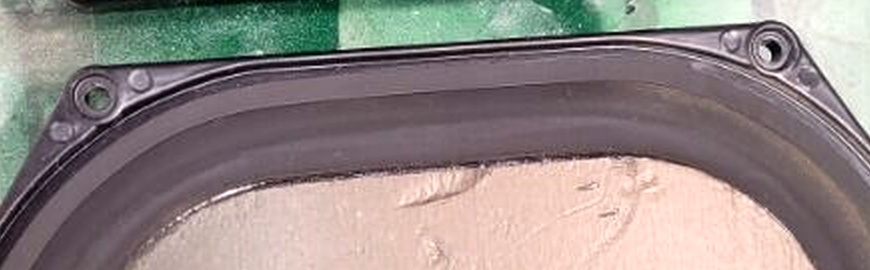
| Fig.3, if you look closely at the photo, you'll notice that the suspension doesn't have any joints, and the mold was also a single piece.. Here the high-resolution photo |
Change the chassis KEF produce more versions, the B139b or sp1044 (1973), the sp1212 and the sp1333 (the last one I suppose in 1993), with a different basket and magnet, but still removable.
 |
| Fig.4, another photo from the Internet (thanks) and from the label we discover that it was produced in week 18 of 1979, the KEF B139 model sp1044, first version. |
For this woofer too, we are studying whether the suspension shows any differences, at least visually.
 |
| Fig.5, even the first version of the SP1044 shows the rubber in a single piece without joints. |
Production of the SP1044 continued for years until the last model passing to a special issue sp1333, all which featured an adhesive label around the magnet.
 |
| Fig.6, from an online auction (thanks), here is the latest model produced by KEF B139, sp1044 (1981?), again with cardboard made of four glued parts, and the hole in the centre is now closed. Here the high-resolution photo |
And here is the usual graphical analysis of the rubber suspension.
 |
| Fig.7, the usual graphical analysis of the woofer suspension shows no joints on the rubber. Here the high-resolution photo |
We don't know why Mr. Irving M. Fried decided to produce a new woofer, or why he chose to have someone else produce it. However, after reading dozens of reviews, it seems that the B139 had a few problems, and production was coming to an end.
Below is his version of the elliptical woofer, which changes everything: basket, magnet, cone shape, etc.
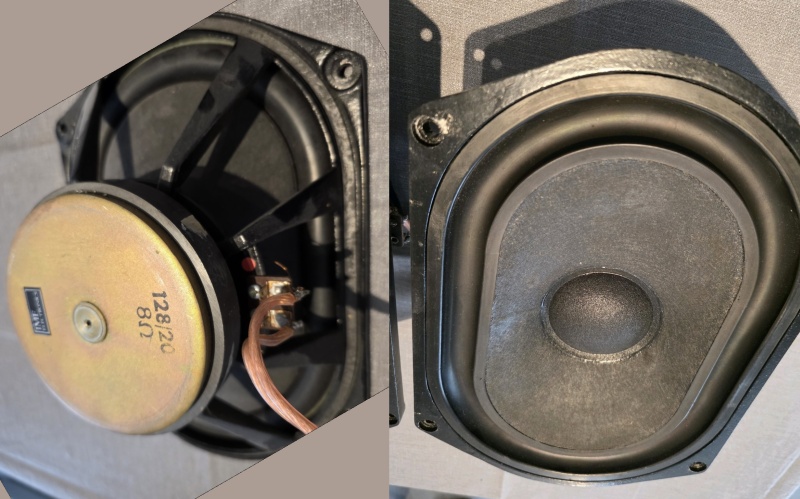 |
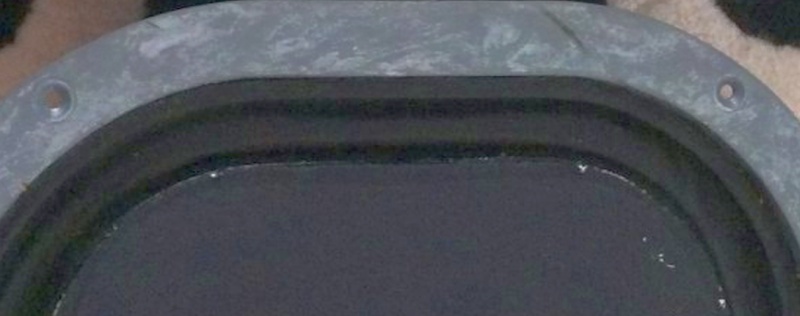
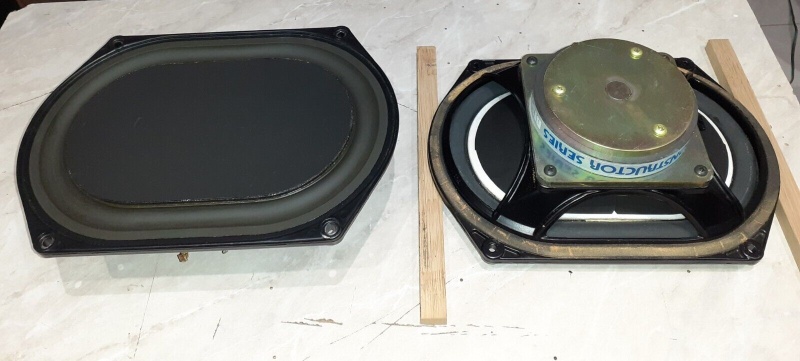
| Fig.8, here is the IMF 128/20, a woofer produced to replace the B139. This photo is also from an online auction (thanks). Note the folded and glued cardboard cone (well done) and the suspension, which we will analyse later. Here the high-resolution photo |
It's certainly not a KEF; there are too many technical differences. However, it's really well made by someone who actually builds speakers. It's not the junk they try to sell us today (the reference to a manufacturer of ..... chatters is not accidental).
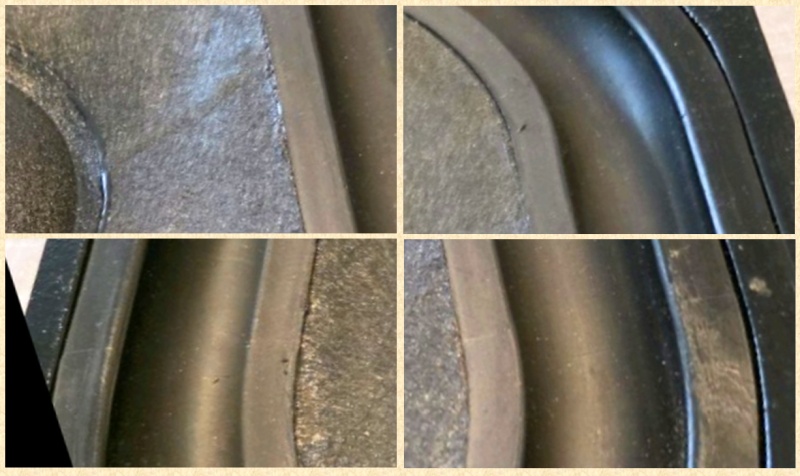 |
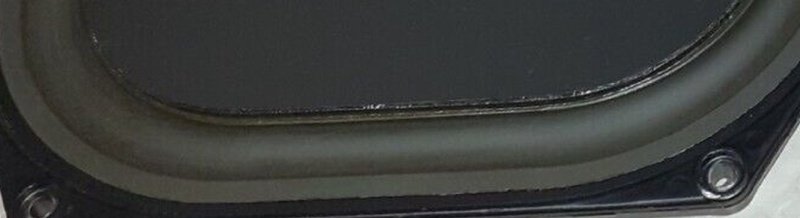
| Fig.9, the photo taken from the Internet is not suitable for graphic analysis, but here are four cut-outs anyway. The suspension is made in one piece, but the mould has left two marks where the curved part joins the straight part. The cone has a double curvature: the one attached to the spider is almost normal, while the upper one is made of folded and glued cardboard. Here the high-resolution photo |
When Mr Irving M. Fried changed brands and began producing TDLs for top models, he changed the woofer once again. On a previous web page, we saw the TDL Monitor Studio 4 with the 3021/GT/01 woofer. We do not know why he decided to have a new woofer produced, but the B139 was by then at the end of its production run and perhaps he did not want to brand the drivers directly.
All TDL woofers were probably custom-made by ELAC (Electro Acoustics) in the UK. ELAC produced most of its drive units at its factories in Tottenham, London, and Bridgend, Wales. The new 3021xxxx woofer is oval-shaped and visually similar to the KEF B139, but it is designed with a concave radiating surface rather than a flat one.
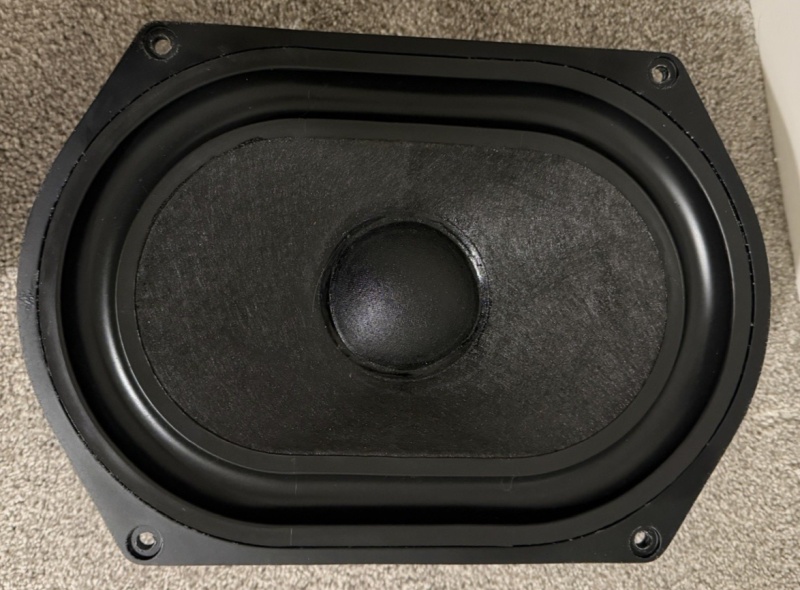 |
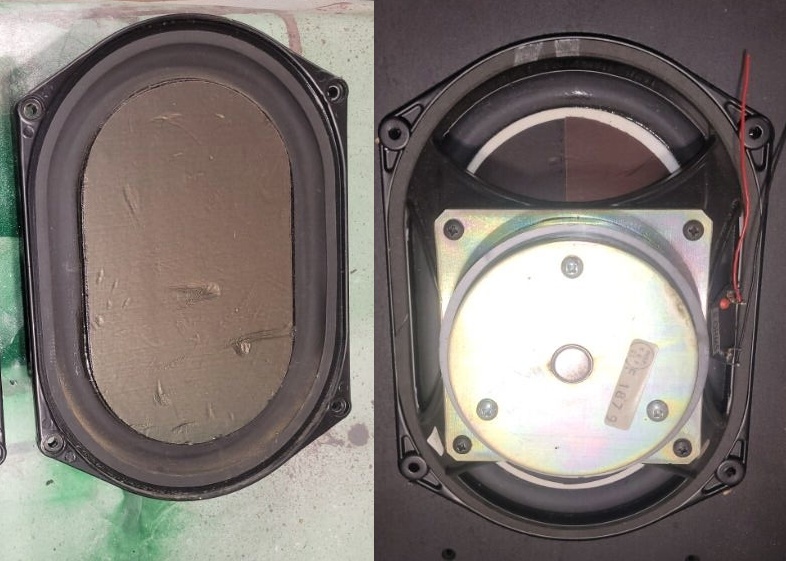
| Fig.10, one of the 3021xxx woofers in perfect condition, which appears to come from a TDL RSTL, photo from the internet (thanks). Here the high-resolution photo |
In this last case too, we use graphical analysis to highlight differences with previous woofers.
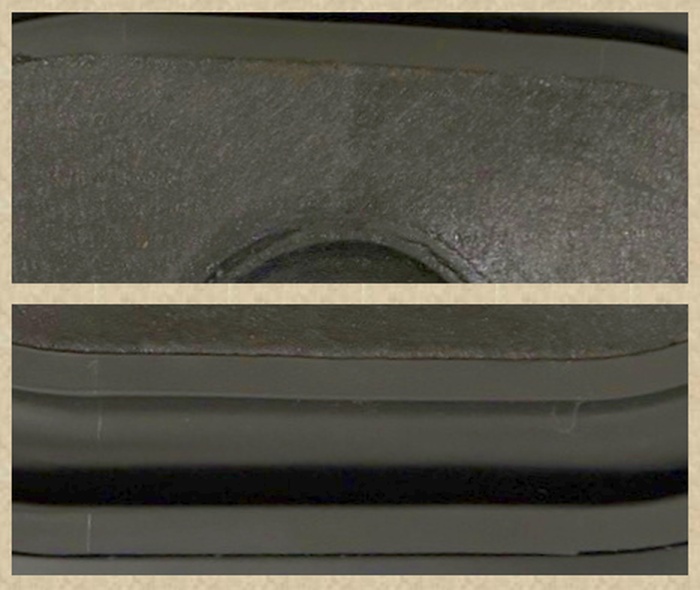 |
| Fig.11, a typical graphic analysis of an RSTL 3021xxx reveals that the cardboard cone is well, securely, glued. The mold joints are clearly visible here, but absent from the lower suspension. Here the high-resolution photo |
After taking dozens of photos, we discovered that switching from KEF to IMF/TDL altered the part we are most interested in, the surround suspension. The mold changes, and perhaps the chemical composition changes, too. We need to analyze what we have, but it is difficult without being able to take a small sample, perhaps 2x2 mm.
The specifications for the 3021/GT/01 woofer can be found, along with a page from TDL showing the curves, below.
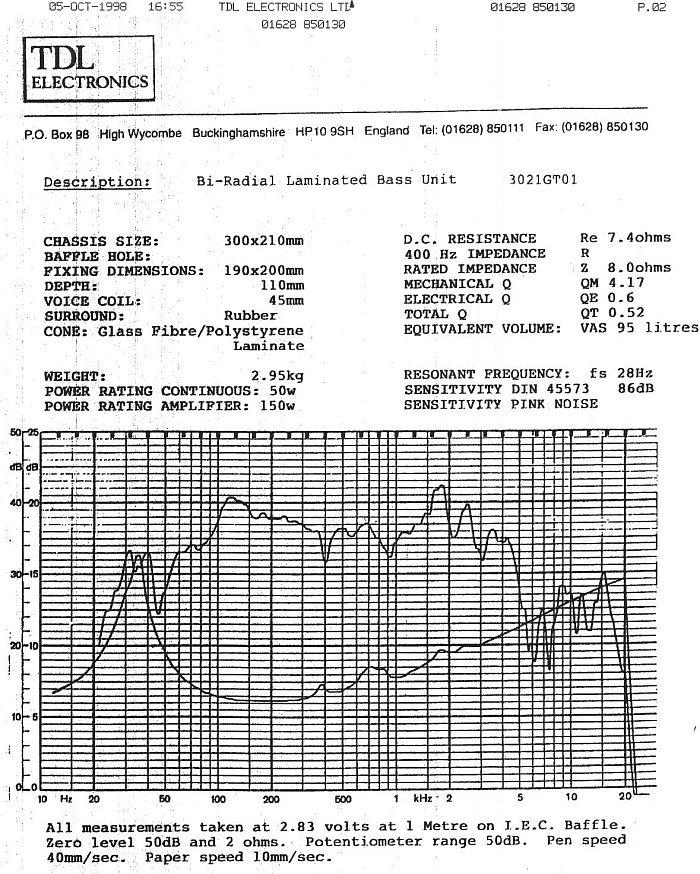 |
| Fig.12, this is the only page on the internet for this TDL woofer. Here the high-resolution version |
What happened, what to do, let's at least try to clarify ideas a little. Please note that, as see above, the shape of the woofer is similar to the B139/SP1044, but the specifications are quite different.
There is little to be done. If a new suspension cannot be found, regardless of the material, we will have to try to restore the one already installed, see below.
When searching for replacement suspension parts from one of the largest suppliers of spare parts for drivers, you will only find three models: foam, cloth/fabric, and rubber. But what kind of rubber are we talking about?
Listing all the commercial names of synthetic rubbers would take too long, so let's look at a description from the Encyclopædia Britannica of Synthetic Rubber.
Which of these synthetic rubbers are used in woofer suspensions? May I remind me that I am a chemist?
 |
| Fig.13, EPDM formula, thanks to Nora Catalina Restrepo-Zapata, Juan Pablo Hernandez Ortiz, Methodology for Generation of Time-Temperature-Transformation (TTT) Diagram: Solid and Cellular EPDM |
We must remember that commercial products are not pure polymers, but rather combinations of various chemical compounds in small percentages that are used to obtain specific characteristics as: additives, curing agents, fillers (carbon black in this case), protective, plasticizer, antioxidant or oxidizer.
By taking a small sample, say 2x2mm, many analytical techniques could give us an answer regarding the composition of the surround. But I have no intention of cutting a piece of rubber, so we need to find a "non-destructive" and perhaps "non-invasive" technique to solve this problem.
The technique of choice for studying industrial polymer compounds already formed in commercial products is infrared spectroscopy.
Infrared spectroscopy (IR) is an analytical technique that uses infrared light to analyze the vibrations of a sample's molecules, providing information about its chemical structure. IR spectroscopy works by measuring how much infrared radiation is absorbed at different frequencies. This corresponds to the energy required to change a molecule's vibrational state. This creates a unique "fingerprint" spectrum that identifies functional groups and helps identify unknown compounds.
Among the many IR techniques, the most widely used for studying polymers is Fourier Transform Infrared spectroscopy (FTIR), is a non-destructive technique that identifies materials by analyzing how they absorb infrared light. Fourier transform: A mathematical operation called a Fourier transform converts the raw signal into a spectrum that plots absorption or transmittance against wavenumber (frequency).
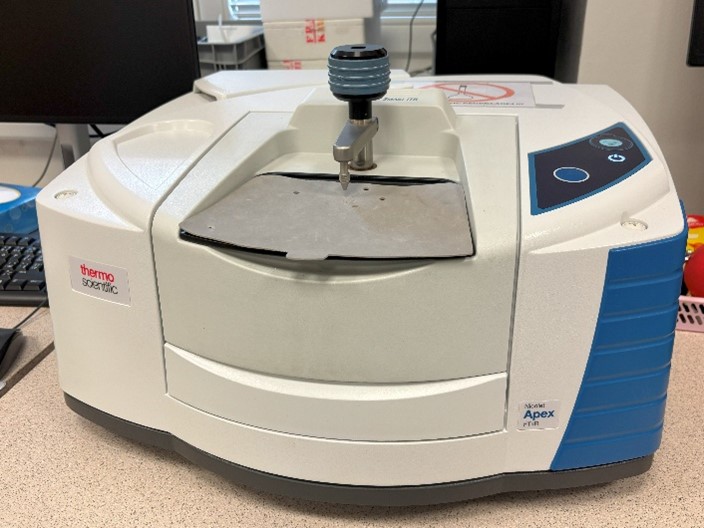 |
| Fig.14, since I don't have this instrument in my laboratory, I have to ask Prof. Martinelli, an expert in polymers, for help, asking him to carry out an analysis of the rubber in the woofer suspension for me |
Given the shape and presumed composition of the polymer, which contains a significant amount of filler, and considering its charcoal black colour, which is probably Carbon Black, a total reflection infrared technique must be used.
The FTIR-ATR is an analytical technique that combines Fourier Transform Infrared (FTIR) spectroscopy with the Attenuated Total Reflectance (ATR) sampling method to identify the molecular composition of materials without extensive sample preparation.
An infrared light beam is sent to the sample. The light was reflected/absorbed by the sample sample's molecules. The reflected light, now containing information about the sample's absorption, is analyzed to create a spectrum. By analyzing this spectrum we can identify the functional groups present in the sample and learn about its chemical structure.
Obtaining the spectrum from the instrument is only the first step. It often needs to be corrected for differences in the absorption of infrared radiation, as well as for the depth of penetration of the beam. But this is not a course in spectroscopy!
 |
| Fig.15, thank you again to Prof. Martinelli for the analysis. Here is the FTIR-ATR spectrum in green and the corrected one in blue. The values in cm-1 of the peaks are shown at the top left, and here is the spectrum in Excel |
The next step is to access spectrum databases (which are almost always fee-based and expensive) and search for a match with the one above.
For polymers that are not widely available commercially, using databases is imperative. However, for the five polymers discussed above, there are scientific publications that analyze and perhaps even study their aging.
Now, let's search bibliographic databases for FTIR, ATR, and the polymers of interest. While we won't present all the works we consulted, we found two interesting papers among them.
-2017-r.jpg) |
| Fig.16, from a paper of Ahmed Alhareb, Hbm Aki, Zab Ahmad, on Journal of Thermoplastic Composite Materials, n.30(8), of 2017 we can find a spectra of NBR. Here the high-resolution version |
And another one that is perhaps even more relevant.
 |
| Fig.17, from a paper of Jiaohong Zhao, Rui Yang, Rossana Iervolino, Stellario Barbera, on Rubber Chemistry And Technology, Vol.86 No.4 of 2013 we can find a spectra of NBR and the simulated aging. Here the high-resolution version |
From this latest work, we can see how the spectrum changes with aging, albeit simulated. The 1000-hour spectrum really resembles ours.
In conclusion, the woofer suspension is made of NBR, which has degraded after 36 years. Fortunately it has not cracked, it has only stiffened due to the progression of polymerization.
 |
| Fig.18, from a paper of Adrien Redon, Jean Benoît Le Cam, Eric Robin, Mathieu Miroir, Jean-Charles Fralin on Journal of Applied Polymer Science, Vol.140, Iss.29, 2023 |
To understand how to intervene, let's also look at the monomers of NBR, from which the long chain above is obtained by polymerisation.
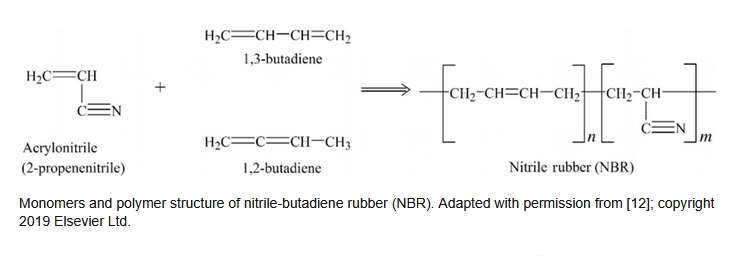 |
| Fig.19, from a paper of Ali Fazli, Denis Rodrigue on Materials Vol.13, n.3, 2020 |
There are many types of NBR. Here is a short list, among which ours appears to be an NBR bonded with an antioxidant. The paper from which the previous figure is taken also contains an interesting paragraph at the end of the conclusions that explains the aging mechanism.
And this is the moment when time-wasters, pundits, gurus, know-it-alls, people who know-nothing-but-talk, quacks, and charlatans start producing miracle potions. To these gentlemen, we remind them of the existence of rubber conditioners that ..... 7.000 product! don't make me talk. Before they start chattering, I would advise these gentlemen to read Laurence W. McKeen's book, The Effect of UV Light and Weather on Plastics and Elastomers, 2019, but 464 pages are too many for a barker/charlatan.
The problem with this polymer seems to be the opposite of that with foam. The close cell elastomeric foam (usually made of polyester, urethane and fillers) degrades by depolymerising, first turning to dust and then recomposing itself like bitumen.
In contrast, in most of the rubbers we have mentioned, the process is reversed: degradation occurs on the C=C double bonds of the molecule, which break and connect multiple chains together. This results in hardening, some fractures, and then complete fragmentation.
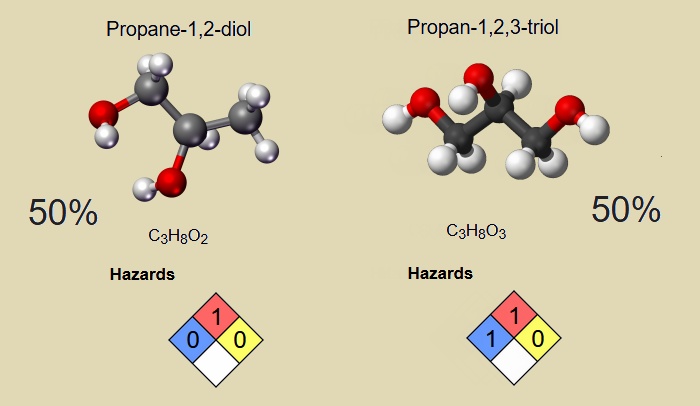 |
| Fig.20, the suggested composition to attempt to "soften" the NBR and prevent future hardening. With mouse-over see the photo of components in bottles |
A mixture of 50% propylene glycol and 50% glycerol is useful because it allows the broken C=C bond to find a molecule to bond with without connecting to a polymer chain. They also prevent oxygen from entering the microfractures and continuing the degradation process.
To be effective, the polymer must be "activated" and allowed to penetrate at least superficially. We utilise heat, but with caution.
application of mixture
Preparation is simple. Using the two purest liquids possible (with a purity of at least 98%), prepare a 50 mL mixture. The application is more delicate because you need to ensure the NBR absorbs the mixture, at least on the surface.
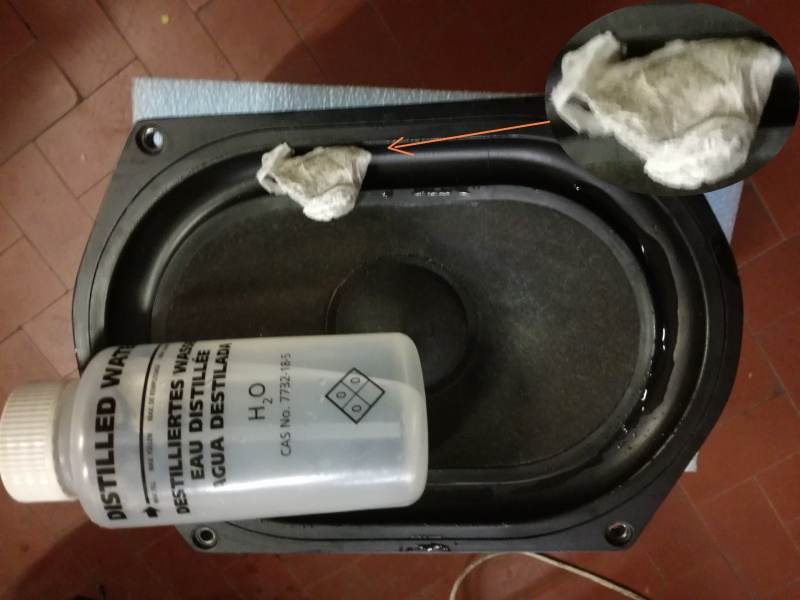 |
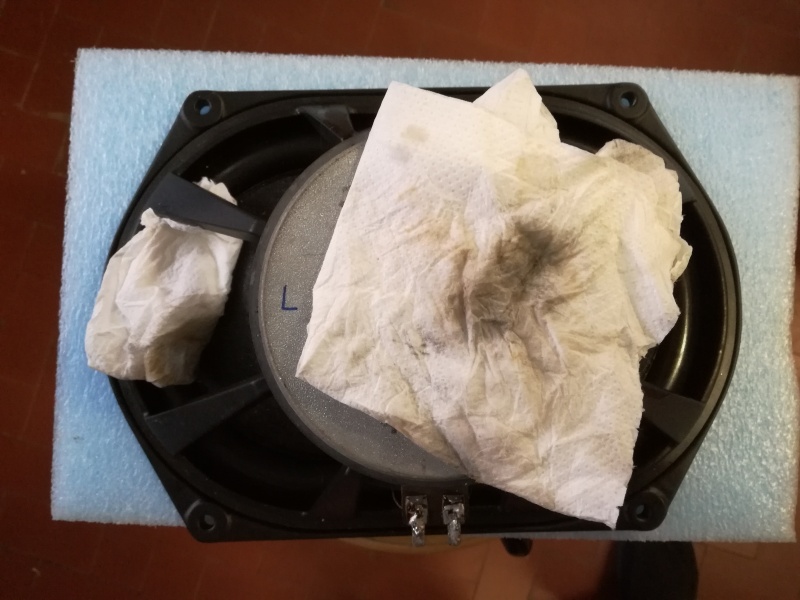
| Fig.21, after years of use, the suspension should be washed twice with distilled water on both sides without wetting the cardboard. After the second wash, the wipe is still dirty in the top right corner. Do not use solvents that could dissolve the rubber, such as alcohol, acetone, stain removers, or similar products (yes it is NBR but we do not know the additives used). Here the high-resolution version |
It is best to heat the NBR before application, but a domestic oven is not sufficient. The temperature must be carefully set and maintained for hours.
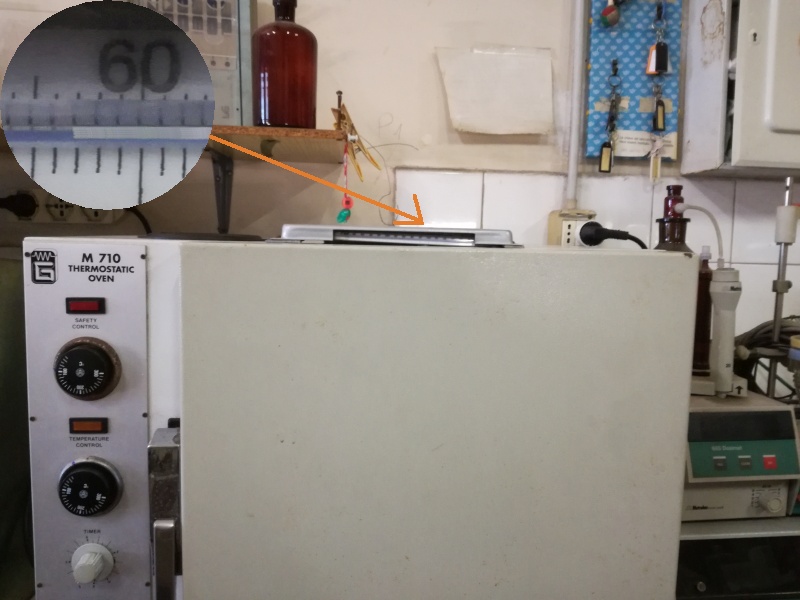 |
| Fig.22, this is a non-ventilated electric heater that is advertised as ± 5°C, but actually has a variation of only ± 2°C. Set it to about 65°C, see the spot on the top left. |
All components of a good woofer, including the adhesives, coil, and cardboard, should be able to withstand temperatures of up to 80°C without any problems. However, NBR degrades at high temperatures, so we limit ourselves to 65°C (see cited works).
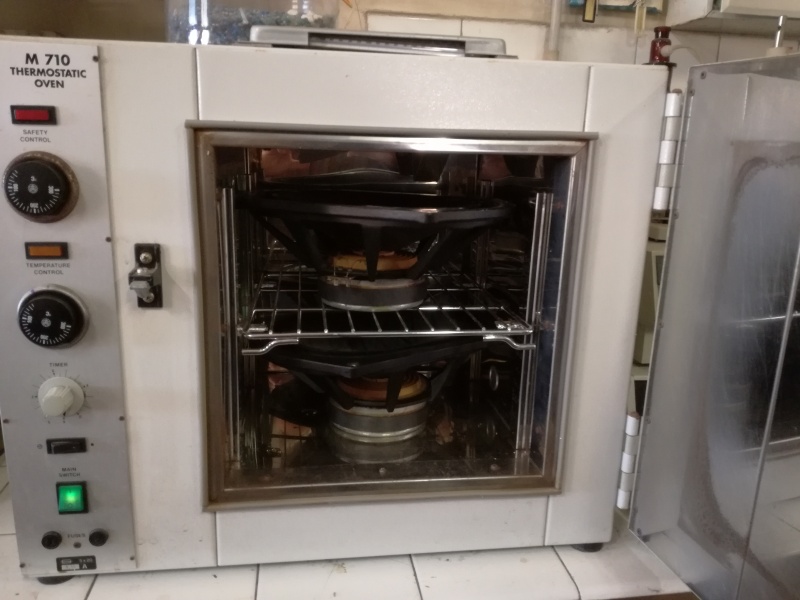 |
| Fig.23, the heater was chosen to accommodate the two woofers |
For hot applications, use a brush to apply the mixture generously without getting the cardboard dirty.
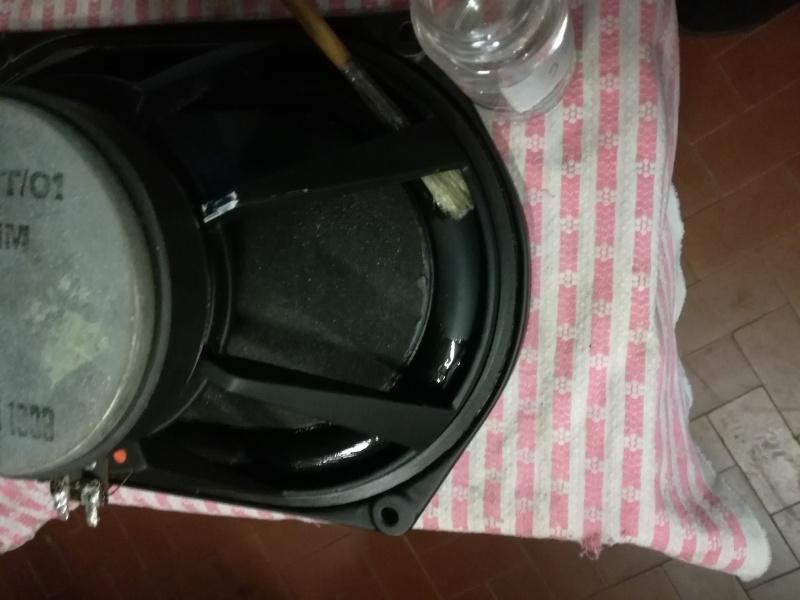 |
| Fig.24, immediately after removing the woofer from the oven, apply the mixture to the rear of the suspension. |
The solution should be abundant but should not drip, and now move on to the front of the woofer.
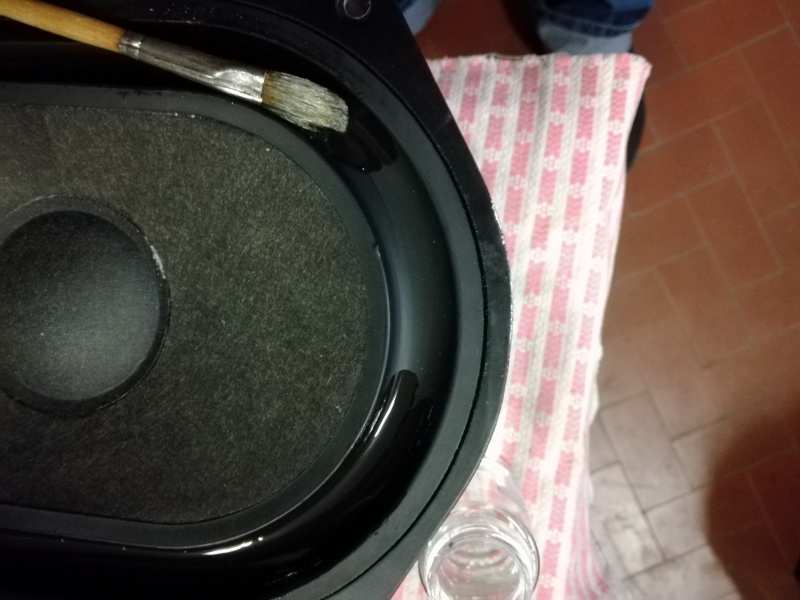 |
| Fig.25, and here is the application on the front side, again without dirtying the cardboard |
The woofer should feel warm after applying the solution to the front face. Now, return it to the oven. Leave them in the oven for at least 2 or 3 hours. Then, turn off the oven and let them cool overnight. The next morning, remove them from the oven and discard any excess solution.
 |
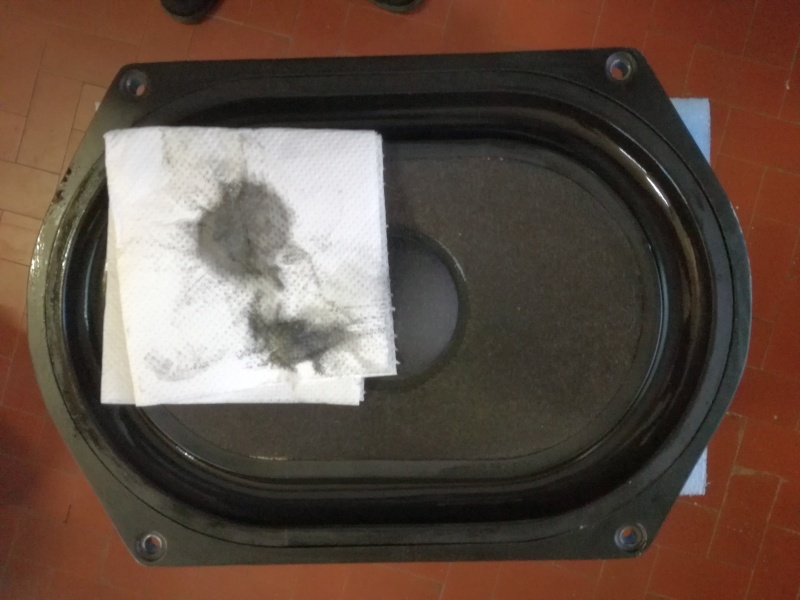
| Fig.26, use plenty of absorbent paper towels to wipe away any excess solution from inside the suspension. The black residue is dirt that the distilled water did not remove, as well as degraded polymer that we partially dissolved |
The wipes do not need to be completely clean, but all excess should be removed. Then move on to the front.
 |
| Fig.27, this side needs to be cleaned really well. If any of the solution remains, the dust will stick like a magnet, but be careful not to remove the mixture that has soaked into the surface. Good luck! |
At the end of the process, the two woofers are ready for reinstallation .... or perhaps not.
In order to determine the usefulness of all this work, the two woofers had to be measured before the intervention. Done.
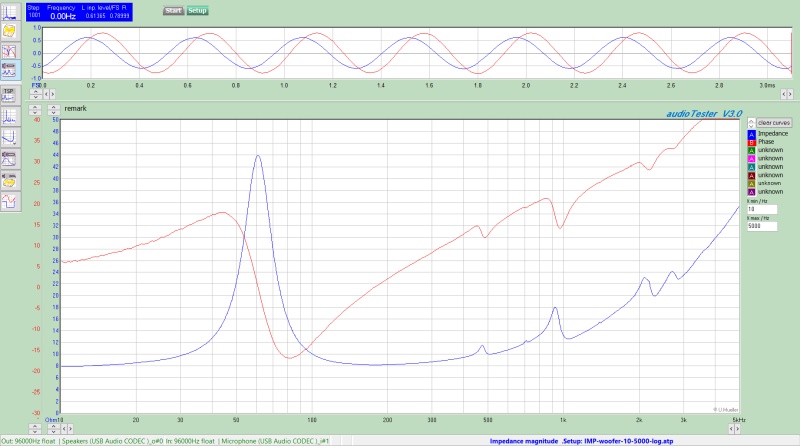 |
| Fig.28, above is a screenshot of the software showing the measurement of the right woofer just before it went into the oven. It was measured again with two weights added. |
The software allows you to save the graph you just obtained as a .CUR file, which you can then load later and perhaps superimpose on another graph. However, it is easier for readers of this page to have .XLS files for calculating minimum, maximum, and difference values.
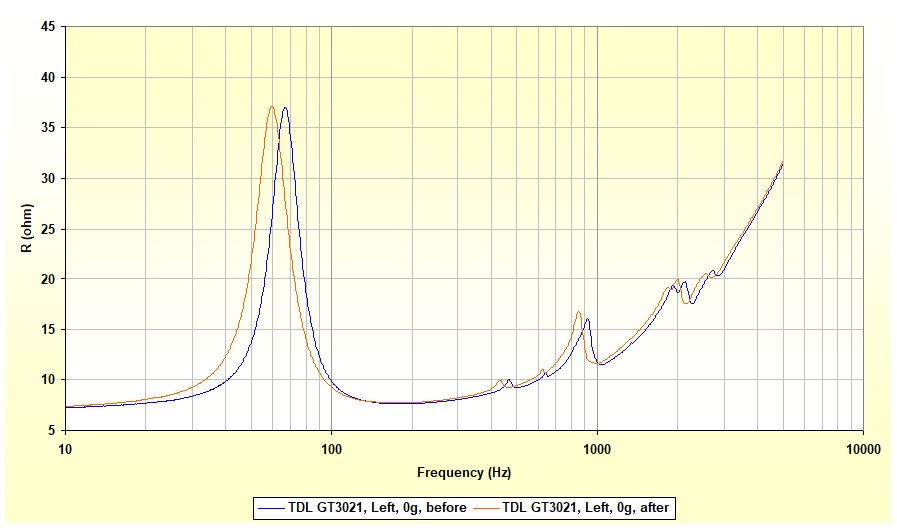 |
| Fig.29, now, let's compare the left woofer's performance before and after treatment. Not only can we see a reduction in the resonance frequency, but we can also see, fortunately, that the shape of the curve remains the same. |
At the end of the paragraph, we present a table with the results, but now let's move on to the other woofer.
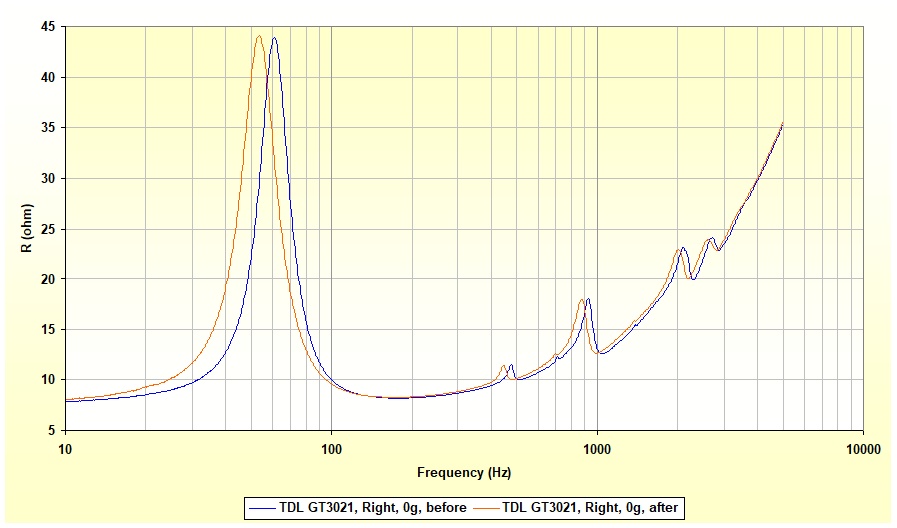 |
| Fig.30, the right woofer already showed lower resonance. Here it is after treatment |
There are various methods for calculating the famous parameters of A.N. Thiele and R.H. Small, including the double mass addition method, which is the one used here.
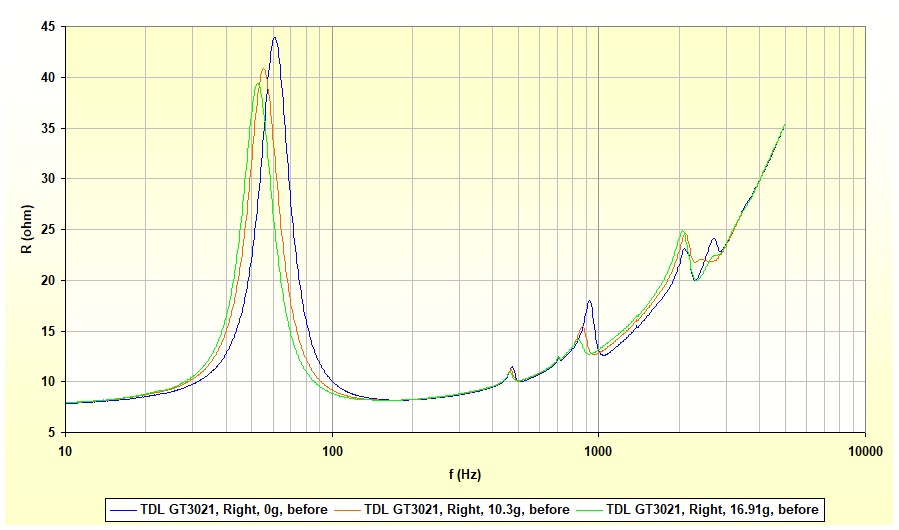 |
| Fig.31, for the right woofer, before restoration, we observe the performance before and after adding two masses. We observe a significant reduction in spurious resonance at around 1000 Hz and an increase at around 2 kHz. |
We have summarized the results in a few tables to make it easier for readers to compare them. At the bottom, however, are all the files with the measurements.
| . | resonance (Hz) | peak height (ohm) | half height full width (Hz) |
| Right, 0g, before | 61.12 | 35.70 | 18.97 |
| Right, 0g, after | 53.30 | 35.84 | 19.61 |
| Difference | 7.82 | -0.14 | -0.64 |
| Left, 0g, before | 66.68 | 29.37 | 19.15 |
| Left, 0g, after | 59.62 | 29.36 | 20.12 |
| Difference | 7.06 | 0.01 | -0.97 |
It seems like all this work to reduce by only 7 or 8 Hz was wasted, but the impregnated solution will prevent further degradation. Perhaps a similar intervention every two years would be advisable (but with spider nuts!). Something else has damaged the woofers.
| Right | grams add. | resonance (Hz) | peak height (ohm) | half height full width (Hz) |
| Right, 0g, before | 0.0 | 61.12 | 35.70 | 18.97 |
| Right, 10.3g, before | 10.30 | 55.35 | 32.64 | 17.86 |
| Right, 16.91g, before | 16.91 | 52.32 | 31.19 | 16.72 |
| Right, 0g, after | 0.0 | 53.33 | 35.84 | 19.61 |
| Right, 10.23g, after | 10.23 | 47.95 | 32.24 | 18.61 |
| Right, 17.02g, after | 17.02 | 45.63 | 30.73 | 17.71 |
| Left | grams add. | resonance (Hz) | peak height (ohm) | half height full width (Hz) |
| Left, 0g, before | 0.0 | 66.68 | 29.37 | 19.15 |
| Left, 10.41g, before | 10.41 | 60.36 | 29.76 | 18.53 |
| Left, 16.94g, before | 16.94 | 57.79 | 25.54 | 17.32 |
| Left, 0g, after | 0.0 | 59.62 | 29.36 | 20.12 |
| Left, 10.42g, after | 10.42 | 53.63 | 26.05 | 19.46 |
| Left, 16.99g, after | 16.99 | 51.03 | 24.80 | 18.25 |
The files below contain data that anyone experienced with the subject matter can use to calculate the well-known woofer parameters before and after treatment.
Datasheet vs our woofer
And finally, a comparison between the impedance curve obtained by digitising the woofer's datasheet and the one acquired after restoration. What a disappointment!
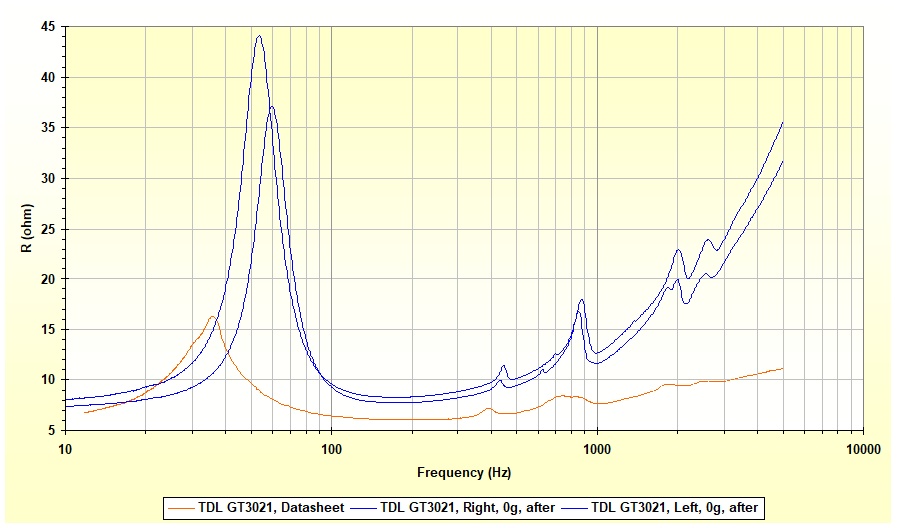 |
| Fig.32, comparison between the curve in the datasheet and that of the two woofers after the intervention. With mouse-over see the chart with different scale |
Doubts about the quality of the TDL datasheet are growing. For example, how can the resonance peak height go from 17 ohms to approximately 40 ohms? This calls into question the accuracy of the resonance frequency in the datasheet, and where is the phase?
| . | resonance (Hz) | peak height (ohm) | half height full width (Hz) |
| Right, 0g, after | 53.30 | 35.84 | 19.61 |
| Left, 0g, after | 59.62 | 29.36 | 20.12 |
| TDL datasheet | 35.64 | 10.19 | 18.36 |
However, by analyzing the expanded curve (with mouse over) and the table, we can see that the peak width is the same and that the spurious resonances have the same frequency and shape (i.e., they are in the same frame). Other doubts.
Measure loudspeaker before and after
tutto questo lavoro sul woofer nasce da alcune misure sulla mie TDL Monitor Studio 4 che mostravano uno strano andamento sulla gamma bassa, ed anche un suono strano.
rifacciamo le misure dopo 24h di rodaggio con rumore rosa ad 1W (non continuative, troppo casino di notte) e disegnamo il grafico qui sotto
|
| Fig.33, comparison between the curve in the datasheet and that of the two woofers after the intervention. With mouse-over see the chart with different scale |
grafico di impedenza migliorato, per ora e' bastante ma cerco uno nuova sospensione in gomma (conosco chi la puo' fabbricare su disegno)
The deterioration of a classic loudspeaker, such as those in this TDL, occurs through three + one factors.
With a new surround (with the right amount of flexibility) available, we could dismantle the entire woofer, find a laboratory that regenerates the magnet**, change the spider, check the condition of the coil and then reassemble everything, centring the cone as best as possible.
* Do not attempt to remagnetize your speakers at home. Do not use neodymium super magnets, large coils, or electric fields. With such high voltages and fields, you risk your life. In any case, you will never be able to build a coherent field parallel to the coil that is strong enough to reorient the magnet.
** Concert amplifiers achieve thousands of watts of power. The coils reach unspeakable temperatures, and the electromagnetic field demagnetizes the semi-permanent magnet. This is why there are laboratories that remagnetize famous and expensive loudspeakers with all of the manufacturer's parameters. See a video.
Instead of uploading all the .CSV files produced by the software, I preferred to put them all in an .XLS file, after conversion, divided into several sheets. Enjoy reading.
| In the last years at Universita' Degli Studi di Roma La Sapienza |
Dr. G. Visco already contract professor for Chemistry in Environment & Cultural Heritage into ---------> |
Laurea Degree Course of Sciences Applied to Cultural Heritage for Diagnostic and for Conservation |